
Creating a ticketed event on SparkGlim allows event organizers, campus groups, and businesses in Ghana and other supported markets to transition from manual ticket sales to a streamlined digital dashboard. By digitizing ticket distribution, organizers can securely handle registrations, define specific tier allocations, monitor transaction histories, and leverage QR-code validation at the venue gates.
Before launching, organizers must understand how to configure their campaign metadata, set regional pricing, and manage attendee allocations. This guide walks you through the step-by-step process of establishing a new ticketing campaign, from initial configuration within the creator dashboard to utilizing mobile tools for on-the-day check-ins.
Initial Setup: Registering Your Creator Account
To begin hosting, you must first register your creator profile. Visit SparkGlim Register to establish your dashboard credentials. Once verified, you will gain access to the campaign creation dashboard, where you can manage payments, team permissions, and campaign-level settings.
Navigating the Dashboard and Mobile Setup
While the desktop dashboard offers comprehensive configuration settings, the SparkGlim Creator Mobile App is useful for real-time monitoring and on-site ticket scanning. Installing the app early allows you to check incoming transactions, view active registrations, and coordinate with team members who require access to ticket validation tools.
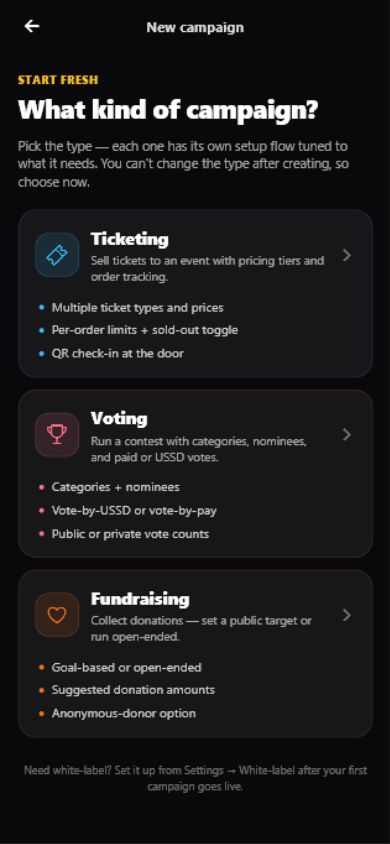
Defining Campaign Details, Dates, and Categories
When building your campaign page, accuracy in your title, description, and visual assets is essential. Ensure your campaign banner clearly states the event name, date, and venue to prevent confusion.
- Campaign Title & Subtitle: Keep it concise and identifiable, such as Legon Tech Summit 2024.
- Event Category: Select Ticketing or Events to ensure correct placement on the SparkGlim Public Events Discovery page.
- Dates & Times: Set start and end dates carefully. If your ticket sales close earlier than the event start time, specify this in the ticket-level rules.
- Description: Outline what is included in each ticket type, parking instructions, and security guidelines.
Configuring Ticket Types, Capacities, and Pricing
Successful events often rely on tiered pricing structures to drive early commitments. SparkGlim allows you to create multiple ticket variants under a single campaign.
Determining Tiers and Regional Pricing
For events in Ghana, you might want to structure tickets in local currencies (GHS) while keeping international attendees in mind. Define your tiers carefully. Setting up an early-bird tier with lower prices is highly recommended for building momentum, while standard pricing can be applied to general admission tiers.
Managing Capacity and Allocations
Every ticket tier needs a defined maximum capacity. Setting a hard limit ensures you never oversell your venue's capacity. SparkGlim's system tracks purchases in real time, automatically disabling specific ticket options once the specified threshold is met.
Testing the Checkout and Attendee Flow
Before sharing your event link publicly, run a test transaction. This step verifies that the purchase process, payment methods, and automated notifications operate correctly for your specific target audience.
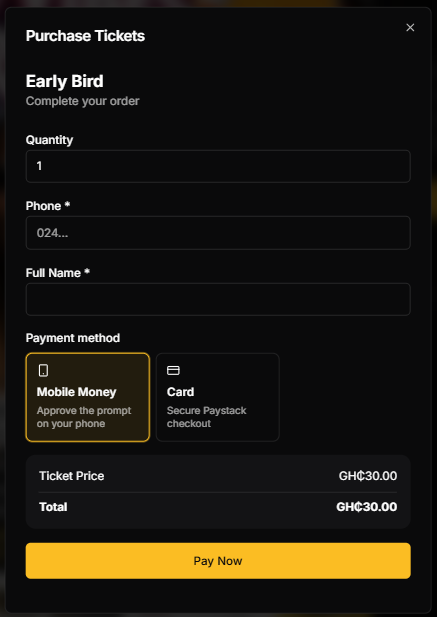
Publishing and Promoting Your Event
Once your configurations are complete and tested, toggle your campaign status to Published. This makes your event public on the SparkGlim platform and indexed on search listings.
Promotional and Operational Checklists
- Share the Direct Link: Distribute your custom URL across digital channels and student or community WhatsApp groups.
- Utilize Discovery Tools: Ensure your public tag is active so users browsing the SparkGlim Events Catalog can find your listing.
- Download the Mobile App: Equipping your gate staff with the SparkGlim Creator Mobile App is mandatory for scanning the QR codes sent to attendees upon purchase.
- Monitor Dashboard Analytics: Track ticket sales, revenue trends, and scan rates in real-time to adjust marketing efforts if certain tiers are underperforming.
Frequently Asked Questions
Do attendees need a SparkGlim account to buy tickets?
No, attendees can complete their ticket purchases as guests. They will receive their digital tickets and QR codes directly via email or SMS once payment is confirmed.
Which payment methods are supported on SparkGlim?
SparkGlim supports major mobile money (MoMo) platforms (such as MTN, Telecel, and AT) alongside standard card payments, though specific availability varies by campaign and region.
How are tickets verified at the venue gate?
Event staff can use the SparkGlim Creator Mobile App to scan the unique QR codes sent to attendees, ensuring quick, secure, and secure entry validation.
Can I adjust ticket capacities after publishing the campaign?
Yes, organizers can adjust active capacities and ticket pricing tiers via the creator dashboard as long as the campaign remains active and changes comply with platform rules.
How can my team members access the scanning tool?
You can grant team members specific dashboard or validation-only access, allowing them to scan QR codes at the gate without accessing full financial reports.
Conclusion
Launching a successful ticketed event requires structured planning, precise capacity configurations, and active monitoring. By leveraging SparkGlim's comprehensive suite of ticketing tools, organizer dashboards, and mobile scanner systems, you can simplify the logistical burden of gate control and financial tracking.
Ready to host your next gathering? Create your SparkGlim creator account today and publish your first ticketed campaign.
Article gallery
Frequently asked questions
Do attendees need a SparkGlim account to buy tickets?
No, attendees can complete their ticket purchases as guests. They will receive their digital tickets and QR codes directly via email or SMS once payment is confirmed.
Which payment methods are supported on SparkGlim?
SparkGlim supports major mobile money (MoMo) platforms (such as MTN, Telecel, and AT) alongside standard card payments, though specific availability varies by campaign and region.
How are tickets verified at the venue gate?
Event staff can use the SparkGlim Creator Mobile App to scan the unique QR codes sent to attendees, ensuring quick, secure, and secure entry validation.
Can I adjust ticket capacities after publishing the campaign?
Yes, organizers can adjust active capacities and ticket pricing tiers via the creator dashboard as long as the campaign remains active and changes comply with platform rules.
How can my team members access the scanning tool?
You can grant team members specific dashboard or validation-only access, allowing them to scan QR codes at the gate without accessing full financial reports.
Found this helpful?



Comments (0)